We’ve all seen snow caves portrayed as the ultimate survival shelter in winter, but are they really the most effective option when time, energy, and readiness matter?
In this blog post:
- Why a Fast Survival Shelter Matters in the Arctic
- Using Spruce Trees as Immediate Survival Shelter
- Tarp Canvas Survival Shelter (Low-Effort, Multi-Day Patrol Base)
- Other Fast Shelter Options in Winter Terrain
- Snow Caves: Warm, Insulated… but Not Time-Efficient
- Key Principles for Any Winter Survival Shelter
- Civilian or Tactical, These Principles Apply to Everyone
- Conclusion
In Arctic terrain, the priority isn’t building something impressive. It’s establishing fast, functional cover that keeps you insulated, concealed, and able to continue the mission.
This blog breaks down the most practical winter shelter options, including how to use natural cover for immediate protection, how to set up efficient tarp shelters for longer stops, and when a snow cave is worth the significant time and energy it requires. It also covers other fast alternatives, such as snow trenches, tree well shelters, and natural rock overhangs, which can provide quick protection when the terrain allows.
Why a Fast Survival Shelter Matters in the Arctic
When temperatures drop and wind picks up, the body loses heat at an alarming rate. Even short exposure can lead to decreased coordination, slower decision-making, and exhaustion. The goal in Arctic terrain isn’t to build a survival shelter that is perfect. But it’s to build a shelter that is functional before the environment takes over.
Episode 3 of the Pro’s Guide to Winter Survival focuses on this exact challenge, showing how to stay insulated, concealed, and operational by using fast, field-proven shelter tactics that conserve strength and keep you ready to move.
A reliable winter survival shelter must achieve three things:
- Provide insulation from the snow and wind
- Reduce energy expenditure (because you need every calorie)
- Offer concealment, whether from wildlife, visibility, or hostile elements
In Arctic terrain, speed and simplicity matter more than complexity.
Using Spruce Trees as Immediate Survival Shelter
One of the fastest shelters you can build isn’t something you build at all, but it’s something nature already built for you.
A dense spruce tree offers ready-made cover, insulation, and concealment. With minimal effort, you can create a temporary rest point that works as a short stop, an observation point, or a place to regroup before moving on.
Why It Works
- The low branches block wind and retain heat.
- Needles and snow create natural insulation.
- You stay concealed but retain almost 360° situational awareness.
- Perfect for short rests where you don’t want to invest time or energy.
How to Set It Up?
1. Clear the snow under the branches with your boots or a small shovel.
2. Use natural materials—boughs, branches, or a ground pad—to create a barrier between you and frozen ground.
3. Slide your pack and gear into the driest spot.
4. If you're in a tactical context, position teammates so both directions are observed even from sleeping bags.

Best For
- 2–3 hour rest periods
- Rapid breaks during patrols
- Emergency survival shelter
- Hidden observation points
This shelter offers minimal comfort but maximum efficiency when time and energy are limited.
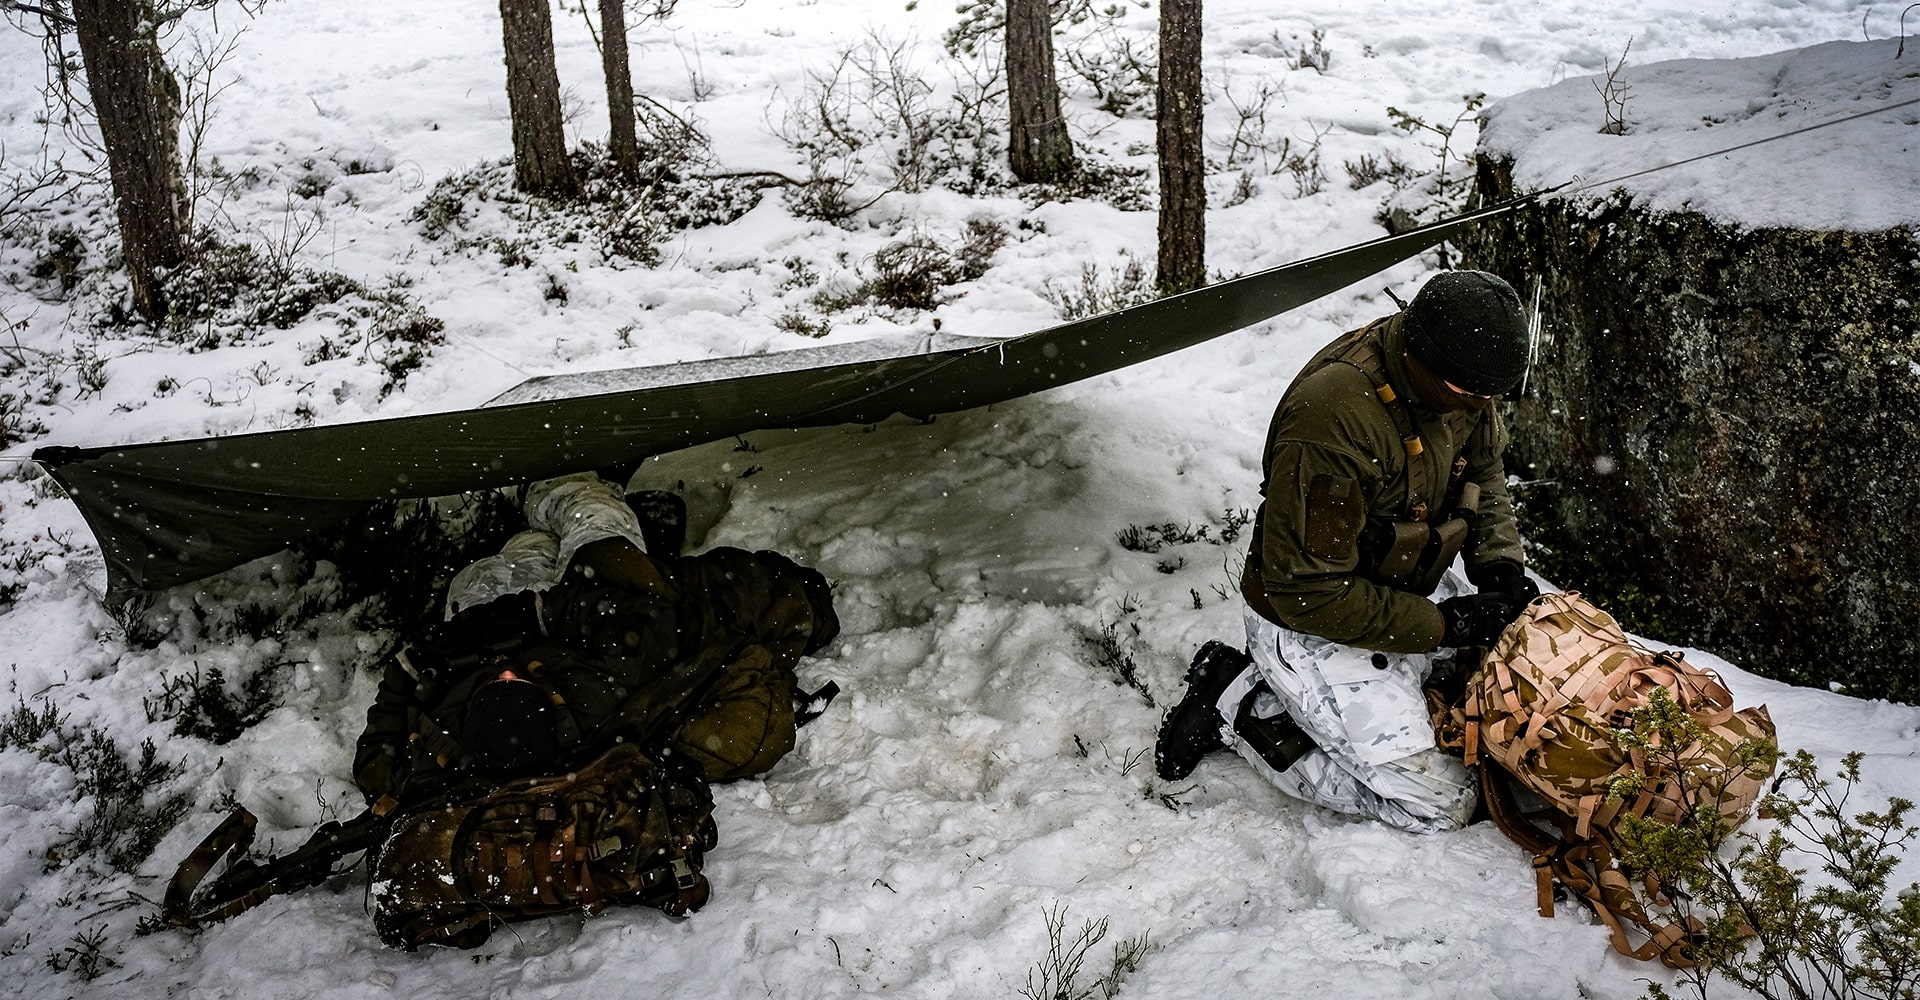
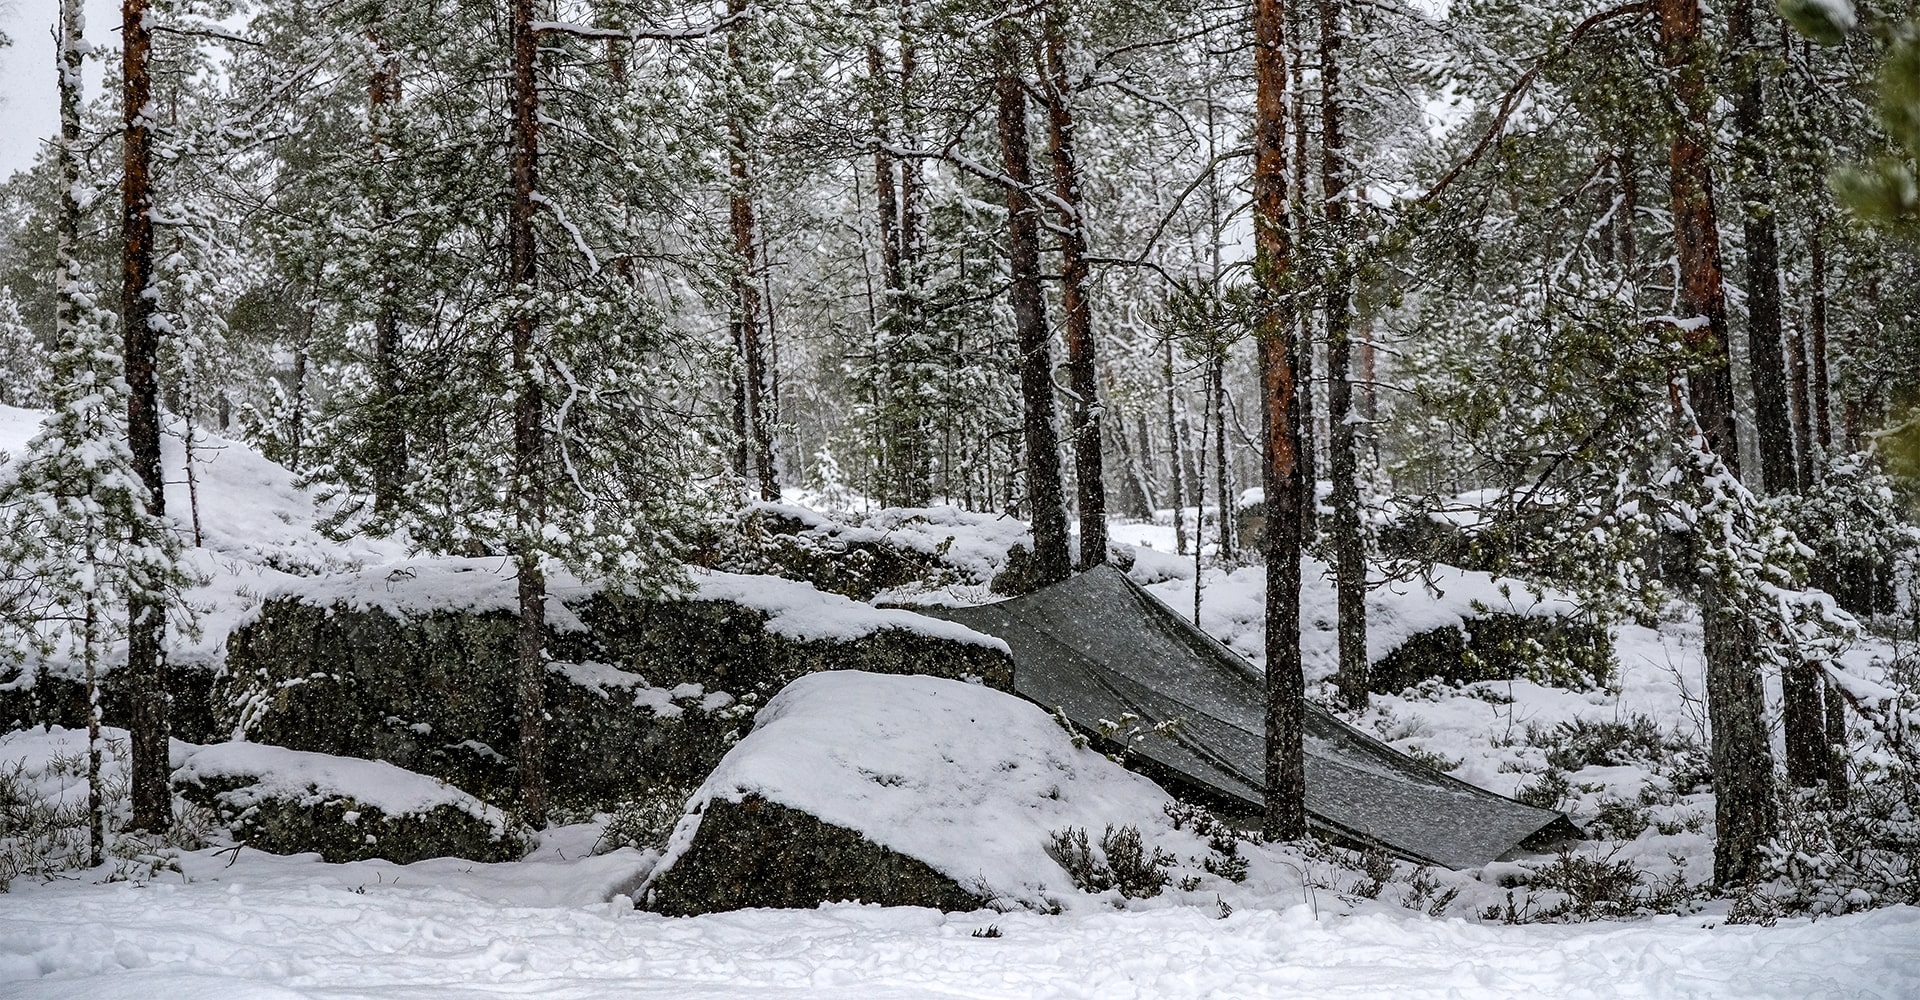
Tarp Canvas Survival Shelter (Low-Effort, Multi-Day Patrol Base)
The tarp canvas shelter is the next step up. It’s still fast to build, but far more comfortable. If you need to stay put for two or three days, this is your best balance between protection, warmth, concealment, and readiness.
Why it works
- Fast to deploy
- Warmer than tree cover
- Allows for small, controlled campfires
- Can be set up low for thermal reduction
- Easy to camouflage with snow and natural materials
The tarp becomes even more effective when you pair it with terrain features, like boulders, that block visibility and heat signatures.
SUBSCRIBE TO UNLOCK OUR EXCLUSIVE CONTENT
Enter your email and get timely updates and relevant intel on tactical topics directly to your inbox.
You are signing up to receive updates via e-mail from which you can opt out at any time. Visit our privacy policy for more info.
Building Your Tarp Shelter
1. Choose your anchor points. Trees, rocks, or even skis can serve as uprights.
2. Angle the tarp so the high end vents smoke upward while directing warm air beneath the shelter.
3. Use nearby boulders as natural walls. They offer protection from wind, reduce thermal detection, and create defensible fighting positions if you’re in a tactical environment.
4. Lower the visible side. Keeping the profile low makes the shelter harder to spot at distance.
Visibility Considerations
At distances of 20–30 meters, the top edge of a tarp can still be visible, especially from a direct, head-on angle. When viewed from the side, the combination of boulders, a low tarp profile, and natural snow buildup helps the shelter blend more effectively into the terrain.
This is where signature management becomes part of your survival shelter strategy. Spruce canopies soften thermal reflection, low tarp angles limit escaping heat, and boulders or snowdrifts break up the shelter’s outline. In Arctic terrain, staying harder to spot, visually and thermally, is often just as important as staying warm.
Best For
- Multi-day patrol bases
- Overnight stays
- Teams needing warmth without losing readiness
- Civilian wilderness travel where a tent is too slow or bulky
Other Fast Shelter Options in Winter Terrain
Depending on the terrain you are moving through, there are a few other survival shelter options that can be used when spruce cover or a tarp setup is not possible.
Snow Trench Shelter
A snow trench is one of the quickest snow-based shelters to build. You dig a narrow body-length trench, line it with branches or pads, and cover it with a tarp, skis, or lightweight poles.
Pros:
- Much faster than a snow cave or quinzee
- Good emergency insulation
- Works well with minimal tools
Best use:
Short, unplanned stops when wind exposure is high and time is limited.
Tree Well Shelter
In deep snow around conifer trees, the area at the base often forms a natural pocket. With basic clearing and added ground insulation, it can work as a rapid survival shelter in forested regions.
Pros:
- Very fast to set up
- Naturally concealed
- Minimal digging required
Best use:
Forest terrain where spruce or fir trees are available.

Rock Overhangs and Natural Windbreaks
Rock ledges, small cave openings, and large boulders can provide instant wind protection and reduce exposure.
Pros:
- Zero energy cost to construct
- Excellent wind shielding
- Works well paired with a tarp
Best use:
Mountainous or broken terrain where natural cover exists.
These methods are not as versatile as spruce cover or tarp shelters, but they are useful when speed is essential and the terrain offers an advantage. They also require far less energy than building a snow cave, which makes them viable for short, emergency stops during movement.
Snow Caves: Warm, Insulated… but Not Time-Efficient
Snow caves often get romanticized as “the ultimate winter survival shelter,” and while the insulation is excellent, the reality is more complicated.
The Real Problem
A proper snow cave takes three to four hours of digging, time you rarely have. It also burns a massive amount of energy while putting you at risk for:
- Oxygen depletion
- Roof collapse
- Moisture buildup
- Overheating followed by sudden chilling
In survival or tactical contexts, this makes snow caves a last resort.
How to Build It (If You Absolutely Must)
- Dig into a stable snowdrift or deep bank: avoid loose, wind-scoured snow.
- Create a small entrance tunnel leading upward into the main chamber.
- Carve a raised sleeping platform so cold air settles below you.
- Keep the roof thick enough for insulation but shaped in a dome to reduce collapse risk.
- Punch at least one ventilation hole and keep it clear to prevent oxygen depletion.
- Smooth the interior walls to reduce dripping and moisture buildup.
Use Only When
- You’re stuck in a storm with no tree cover
- You need long-term warmth
- No natural or tarp-based survival shelter is possible
- You have the time and team strength to safely build it
Otherwise, stick to faster shelters that preserve strength instead of draining it.
In Arctic terrain, everything comes down to energy budgeting. Every hour of digging can cost hundreds of calories you may not recover. Choosing the right survival shelter is also choosing how to spend limited energy over the next 12–24 hours.
Key Principles for Any Winter Survival Shelter
Regardless of what you build, every effective winter survival shelter follows the same core rules:
- Build Low and Small: Smaller shelters trap heat better and use less energy to warm.
- Insulate From the Ground: Snow steals heat by conduction. Always put something, such as branches, packs, or pads, between you and the surface.
- Use Terrain to Your Advantage: Rocks, fallen trees, and snowdrifts all create natural windbreaks and camouflage.
- Keep Ventilation in Mind: Even small fires create moisture and condensation. Without airflow, your gear and layers will freeze from the inside out.
- Always Stay Dry: Moisture is the fastest route to hypothermia. Manage sweat, melting snow, and condensation constantly. For more information on managing moisture in your layers, see Common Winter Layering Mistakes.
Civilian or Tactical, These Principles Apply to Everyone
You don’t need to be military to benefit from winter shelter tactics.
Hikers, rescuers, mountain workers, hunters, and anyone who travels in cold environments face the same risks:
- Wind
- Wet snow
- Fatigue
- Poor visibility
- Rapid temperature drops
The survival shelters in this guide aren’t just theoretical. They’re simple systems that work when you're exposed, tired, and low on daylight. Knowing them can make the difference between discomfort and danger… and sometimes between life and death.
Conclusion
Building a fast, functional survival shelter is a core Arctic skill. Spruce trees offer immediate cover with almost no effort. Tarps provide multi-day protection with good concealment. Snow caves deliver excellent insulation but require significant time and energy.
Understanding the strengths and limitations of each option allows you to choose the right approach for the conditions you face. In cold environments, efficient shelter building directly supports performance, safety, and endurance.